While taking portraits of people there are several things you need to think about to make them feel and look amazing in your portraits.
Knowing how to use the light available is important. If you don’t know how to shoot with natural light, don’t worry, I’m here to help!
In this post I’m going to share with you photography and posing tips, while we will look at 6 easy to use setups for a natural light portrait photographers. I will explain what they are, why are they important and I will give you tips on how you can recreate them while taking portraits with natural light.
6 natural light setups for portrait photography
- Setup 1 – Short lighting
- Setup 2 – Rembrandt lighting
- Setup 3 – Split lighting
- Setup 4 – Loop lighting
- Setup 5 – Butterfly lighting
- Setup 6 – Broad lighting
Natural light setup 1 – Short lighting
In short lighting, the face is turned towards the light source. As shown in the example here, short lighting puts the side turned towards the camera in more shadow. It is often used for low key, or darker portraits. It puts part of the face in shadow. It’s more sculpting, and it had and adds 3D qualities. It can be slimming and flattering for most people.
Posing Tip:
Pose you model on an angle towards the light, the window or the open door. So part of the face, that is turned away from the camera will have more light on than the part of the face that is closer to camera. Keep in mind that with the short lighting technique your model should have the shadow on the larger part of the face.
Natural light setup 2 – Rembrandt lighting
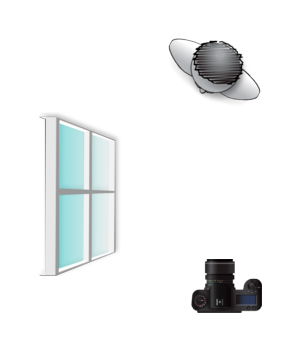
 Rembrandt lighting is so named because the painter Rembrandt, often used this pattern of light in his paintings. Rembrandt lighting is identified by the triangle of light on the cheek. Unlike loop lighting where the shadow of the nose and cheek do not touch, in Rembrandt lighting they do meet. This techniques creates that trapped little triangle of light in the middle. To create proper Rembrandt lighting make sure the eye on the shadow side of the face has a catch light, otherwise the eye will be “dead”, and will lack that captivating sparkle. Rembrandt lighting is dramatic, so it should add darker mood to your image.
Posing Tip:
Dark backgrounds with limited source of light work best. To create Rembrandt lighting your model should turn slightly away from the light. The light must be above the top of their head so that the shadow from their nose falls down towards the cheeks. Not every person’s face is ideal for creating Rembrandt lighting effect. If they have high or prominent cheek bones, high chances it will work. If they have a small nose or flat bridge of the nose, it may be more challenging.
Natural light setup 3 – Split lighting
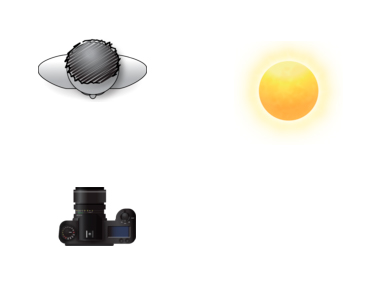 Split lighting is exactly as the name implies. This effect is achieved when the light on your models face is split exactly in equal halves, with one side being in the light, and the other in shadow. Split lighting technique has a strong raw, masculine flare to it, and as such is usually used for portraying man than it is for women. But as with all artistic creative fields, how you use it, is up to you dear one.
Natural light setup 4 – Loop lighting
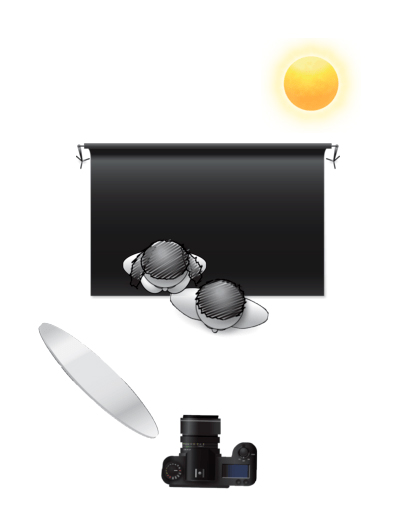 Loop lighting is made by creating a small shadow of the models noses, on their cheeks. In loop lighting the shadow of the nose and that of the cheek do NOT touch. Loop light is a popular lighting effect, as it is easy to create and it flatters most people.
Posing Tip:
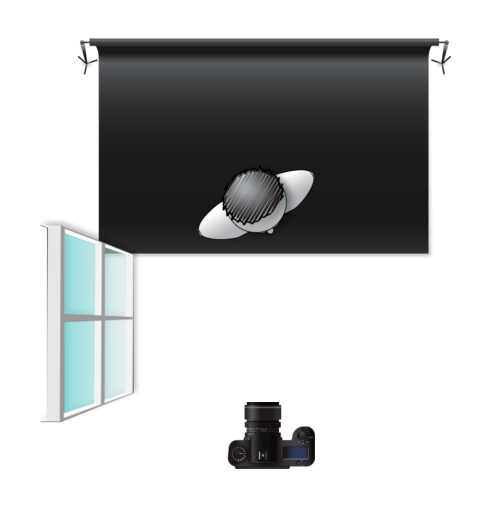
To create loop lighting, it will depend of the model you are shooting, but general rule is that the light source should be slightly higher than eye level, and about 45 degrees from the camera. Keep the shadow small and slightly downward pointing, but be aware of having your light source to high which will create odd shadows. And it might reduce the catch-lights in your models eyes. In this diagram the black backdrop represents the bank of trees behind them. The sun is coming over the trees but they are completely in the shade. A white reflector is used at camera left to bounce light back into the subjects’ faces. The reflector doesn’t need to be in the direct sun, as long as it still catches and adds the light. Play with the angles, and see what works best.
Natural light setup 5 – Butterfly lighting
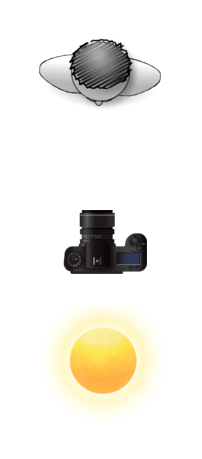 Butterfly lighting effect created a butterfly shaped shadow. As the main light source is placed above and directly behind the camera, shadow is created under the nose. To use this technique you need to basically shoot underneath the light source. It is most often used for glamour style shots, and to create shadows under the cheeks and chin. It is also flattering for people with defined or prominent cheek bones, a slim face or for older subjects as it emphasizes wrinkles less than side lighting.
Posing Tip:
Butterfly lighting effect is created by having the light source directly behind the camera and slightly above eye or head level of your model. It might be useful at times, to place a reflector directly under your models chin, and your model could even hold it. This Keep in mind that this technique is tougher to create using window light with a reflector alone. As harder light source like the sun is needed to produce the more defined shadow under the nose.
Natural light setup 6 – Broad lighting
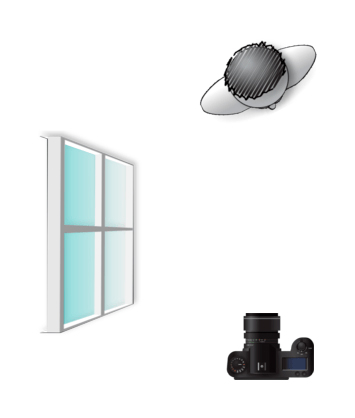 Broad lighting is a style of lighting. Any of the mentioned effects of light can be either broad or short: loop, Rembrandt, split. Broad lighting is when your model’s face is slightly turned away from center, and the side of the face which is toward the camera is in the light. This produces a larger area of light on the face, and a shadow side which appears smaller. Broad lighting is sometimes used for “high key” portraits. This type of lighting makes the model’s face look wider. It could be used for example on someone with a very slim face to widen it. So try to avoid it on someone with round faced.
Posing Tip:
To create broad lighting effect, place your model close to the window/ door and ask them to turn their face away from the light source. With this technique, the side of the face that is closer and turned towards the camera should have more light on it. While the shadows should be falling on the far side of the face, furthest from the camera.
Are you up for a challenge? I have a practice exercise for you!
Ask someone you are comfortable with and love being around to pose for you. And start with practicing creating each of the lighting patterns, and using all the tips I shared.
Your job is to create portraits with at least 3 of the lighting styles mentioned. The lighting stile you choose is up to you but make sure to challenge yourself a little, and till you try it you don’t know if you actually love it or not. So choose 3… or go really adventurous and try out all 6 setups.
- Setup 1 – Short lighting
- Setup 2 – Rembrandt lighting
- Setup 3 – Split lighting
- Setup 4 – Loop lighting
- Setup 5 – Butterfly lighting
- Setup 6 – Broad lighting
Use light from a window, doors or the sun, just make sure to use a light source that will let you see what’s happening. Keep in mind that with photography the more you shoot, the more you practice, the better you get.
Take your time, and make sure to make it fun for yourself and for your lovely model. This really should be a fun process… you are learning something new, gaining new skills and becoming a better photographer in the process.
Make sure to share your pictures and your “ahhaaaaa” moments in the comments. But also your challenges or problems you encountered. I’ll solve them for you, we all can learn from it.
With love,
Marta
Stay connected!
Website: martahurtado.com | Facebook: Marta Hurtado Photography
Google +: Marta Hurtado Photography | Pinterest: pinterest.com/hurtadomarta/
Instagram: instagram.com/martahurtadophotography
Twitter: twitter.com/m_sunshine
